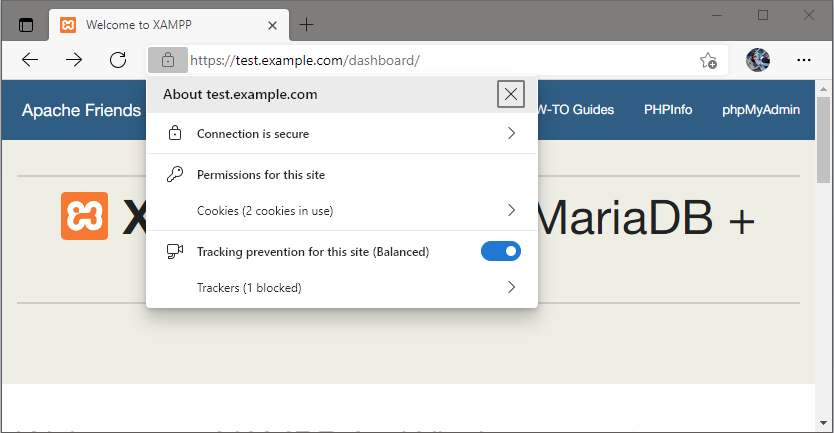
Chứng chỉ SSL mặc định của XAMPP không đủ hợp lệ và trình duyệt như Microsoft Edge không công nhận do thiếu các thông tin cần thiết như Subject Alternative Name. Sau đây là phương pháp tạo chứng chỉ SSL tương thích với Windows.
Tạo chứng chỉ SSL cho XAMPP
Trước hết chúng ta sẽ tạo một file cấu hình mẫu chung cho tất cả các certificate bây giờ và về sau. File này sẽ được xử lý bởi một Batch Script để thay thế {{DOMAIN}} bằng tên miền chúng ta chọn.
Bạn có thể tùy ý chỉnh sửa các trường thông tin mặc định về cá nhân, tổ chức để tạo chứng chỉ cho nhanh.
xampp\apache\cert-template.cnf
[ req ]

default_bits        = 2048
default_keyfile     = server-key.pem
distinguished_name  = subject
req_extensions      = req_ext
x509_extensions     = x509_ext
string_mask         = utf8only

[ subject ]

countryName                 = Country Name (2 letter code)
countryName_default         = VN

stateOrProvinceName         = State or Province Name (full name)
stateOrProvinceName_default = Hanoi

localityName                = Locality Name (eg, city)
localityName_default        = Hoan Kiem

organizationName            = Organization Name (eg, company)
organizationName_default    = iCreativ

commonName                  = Common Name (e.g. server FQDN or YOUR name)
commonName_default          = *.{{DOMAIN}}

emailAddress                = Email Address
emailAddress_default        = admin@{{DOMAIN}}

[ x509_ext ]

subjectKeyIdentifier   = hash
authorityKeyIdentifier = keyid,issuer

basicConstraints       = CA:FALSE
keyUsage               = digitalSignature, keyEncipherment
subjectAltName         = @alternate_names
nsComment              = "OpenSSL Generated Certificate"

[ req_ext ]

subjectKeyIdentifier = hash

basicConstraints     = CA:FALSE
keyUsage             = digitalSignature, keyEncipherment
subjectAltName       = @alternate_names
nsComment            = "OpenSSL Generated Certificate"

[ alternate_names ]

DNS.1       = localhost
DNS.2       = *.{{DOMAIN}}
DNS.3       = {{DOMAIN}}
Sau đây là Batch Script sẽ yêu cầu bạn nhập một tên miền và sẽ tạo ra certificate cho cả Wildcard domain. Nghĩa là nếu bạn nhập example.com thì certificate tạo ra sẽ tương thích cho cả *.example.com ví dụ www.example.com, app.example.com, upload.example.com v.v…
Chứng chỉ tạo ra có hiệu lực trong vòng 10 năm (tham số -day 3650).
xampp\apache\my_makecert.bat
@echo off
SET /p domain="Enter Domain: "
SET OPENSSL_CONF=./conf/openssl.cnf

REM Read the "cert-template.conf" file and replace all {{DOMAIN}} placeholders by the entered domain.
SETLOCAL enabledelayedexpansion
SET INTEXTFILE=cert-template.cnf
SET OUTTEXTFILE=temp_cert.cnf
SET SEARCHTEXT={{DOMAIN}}
SET REPLACETEXT=%domain%

IF exist %OUTTEXTFILE% del /F %OUTTEXTFILE%
FOR /f "tokens=1,* delims=¶" %%A in ( '"findstr /n ^^ %INTEXTFILE%"') do (
    SET string=%%A
    FOR /f "delims=: tokens=1,*" %%a in ("!string!") DO SET "string=%%b"
    IF    "!string!" == "" (
            echo.>>%OUTTEXTFILE%
    ) ELSE (
            SET modified=!string:%SEARCHTEXT%=%REPLACETEXT%!
            echo !modified! >> %OUTTEXTFILE%
    )
)

REM Create the target directory.
IF NOT EXIST conf\%domain% mkdir conf\%domain%

REM Create the certificate and key files.
bin\openssl req -config %OUTTEXTFILE% -new -sha256 -newkey rsa:2048 -nodes -keyout conf\%domain%\server.key -x509 -days 3650 -out conf\%domain%\server.crt

REM Delete the written file "cert.conf" as this file would only be used to create the certificate.
IF EXIST %OUTTEXTFILE% del /F %OUTTEXTFILE%

echo.
echo -----
echo The certificate was provided.
echo.
pause
Nhấp đúp chuột vào my_makecert.bat để khởi chạy chương trình tạo chứng chỉ SSL. Ở đây tôi tạo chứng chỉ cho tên miền example.com, hãy điền example.com khi xuất hiện prompt Enter Domain, rồi cứ thế mà Enter thôi hoặc chỉnh sửa các thông tin nếu cần thiết – trừ phần Common Name ra.
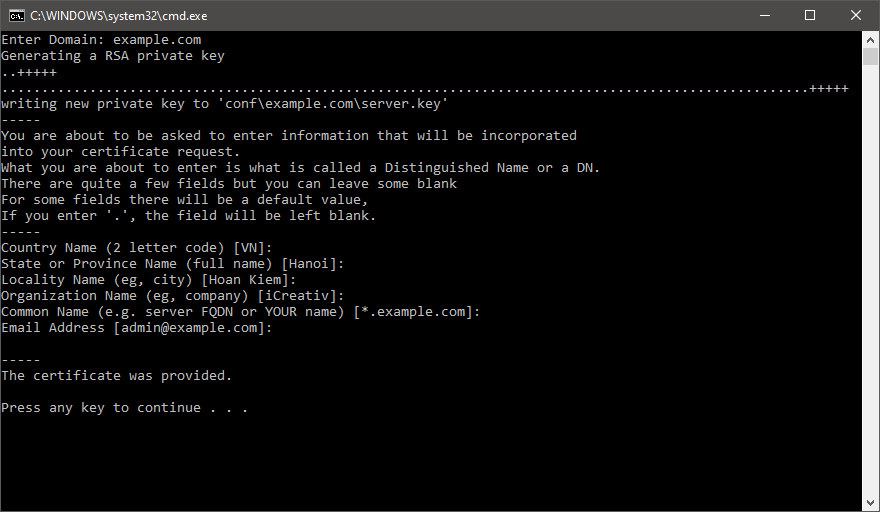
my_makecert.batEnter Domain: example.com Generating a RSA private key ..+++++ .....................................................................................................+++++ writing new private key to 'conf\example.com\server.key' ----- You are about to be asked to enter information that will be incorporated into your certificate request. What you are about to enter is what is called a Distinguished Name or a DN. There are quite a few fields but you can leave some blank For some fields there will be a default value, If you enter '.', the field will be left blank. ----- Country Name (2 letter code) [VN]: State or Province Name (full name) [Hanoi]: Locality Name (eg, city) [Hoan Kiem]: Organization Name (eg, company) [iCreativ]: Common Name (e.g. server FQDN or YOUR name) [*.example.com]: Email Address [admin@example.com]: ----- The certificate was provided. Press any key to continue . . .
Chứng chỉ mới được tạo gồm 2 file là server.crt và server.key sẽ lưu tại xampp\apache\conf\example.com.
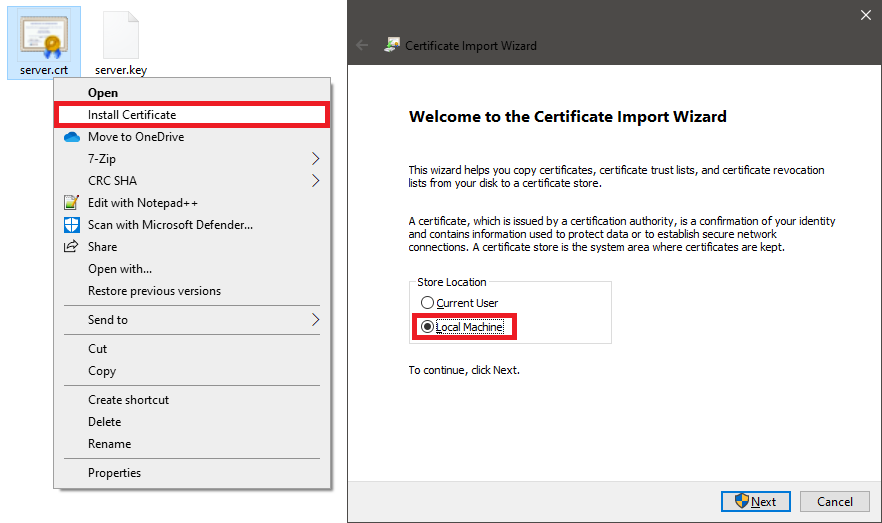
Đăng ký chứng chỉ mới với Windows
Chuột phải lên file chứng chỉ server.crt và chọn Install Certificate để mở Certificate Import Wizard, sau đó chọn Local Machine.
Tiếp theo hãy chọn Place all certificates in the following store, và ấn nút Browse để mở cửa sổ Select Certificate Store, chọn Trusted Root Certification Authorities.
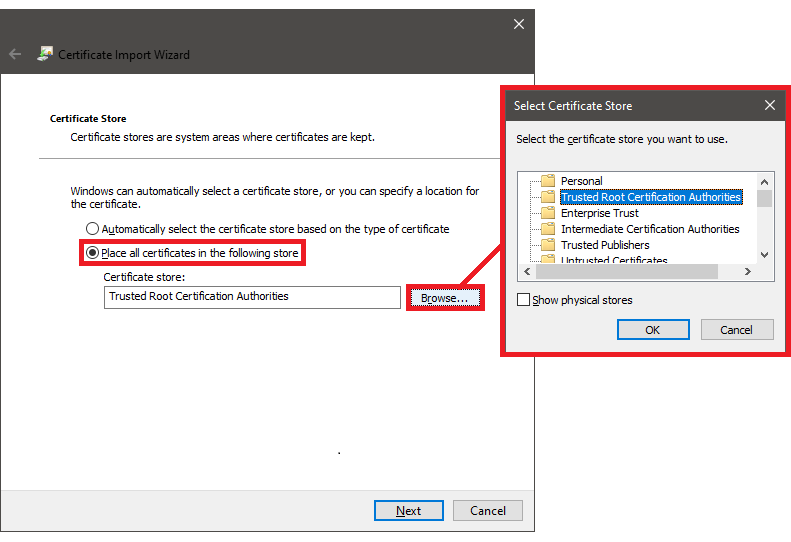
Sau đó ấn Next rồi Finish, vậy là hoàn thành quá trình đăng ký chứng chỉ mới cho tên miền example.com, tất nhiên chỉ có hiệu lực trên máy tính này thôi.
Lưu ý: Mozilla Firefox không duyệt chứng chỉ thông qua Windows nên phương thức trên không có hiệu lực với trình duyệt này.
Cấu hình Apache Virtual Host
Bổ sung cụm cấu hình sau vào file httpd-vhosts.conf của XAMP. Lưu ý những thông tin liên quan đến tên miền gồm ServerName, ServerAlias, cùng thông tin chứng chỉ SSL là SSLCertificateFile và SSLCertificateKeyFile.
Tôi có bổ sung một đoạn tự động redirect từ HTTP về HTTPS bằng mod_rewrite; nếu cảm thấy không cần thiết, bạn có thể bỏ đoạn đó đi.
Ngoài ra bạn có thể thay đổi DocumentRoot nếu cần thiết.
xampp/apache/conf/extra/httpd-vhosts.conf
<VirtualHost *:80>
    ServerName example.com
    ServerAlias *.example.com
    ServerAdmin webmaster@localhost
    DocumentRoot "C:/xampp/htdocs"
    # Redirect HTTP to HTTPS
    <IfModule mod_rewrite.c>
        RewriteCond %{HTTPS} off
        RewriteRule ^(.*)$ https://%{HTTP_HOST}%{REQUEST_URI} [L,R=301]
    </IfModule>
    ErrorLog "logs/error.log"
    CustomLog "logs/access.log" common
</VirtualHost>

<VirtualHost *:443>
    ServerName example.com
    ServerAlias *.example.com
    ServerAdmin webmaster@example.com
    DocumentRoot "C:/xampp/htdocs"
    SSLEngine on
    SSLCertificateFile "${SRVROOT}/conf/example.com/server.crt"
    SSLCertificateKeyFile "${SRVROOT}/conf/example.com/server.key"
    ErrorLog "logs/example.com-error.log"
    CustomLog "logs/example.com-access.log" common
</VirtualHost>
Tất nhiên bạn có thể cấu hình Virtual Host cho từng sub domain cụ thể, tuy nhiên hãy định nghĩa chúng trước đoạn cấu hình nói trên. Lưu ý nhập đúng đường dẫn đến chứng chỉ SSL.
<VirtualHost *:443>
    ServerName pwa.example.com
    ServerAdmin webmaster@example.com
    DocumentRoot "D:/xampp/htdocs/pwa"
    <Directory "D:/xampp/htdocs/pwa">
        Order Allow,Deny
        Allow from all
    </Directory>
    SSLEngine on
    SSLCertificateFile "${SRVROOT}/conf/example.com/server.crt"
    SSLCertificateKeyFile "${SRVROOT}/conf/example.com/server.key"
    ErrorLog "logs/pwa-error.log"
    CustomLog "logs/pwa-access.log" common
</VirtualHost>

<VirtualHost *:80>
    ServerName example.com
    ServerAlias *.example.com
    ...
Cấu hình local DNS để sử dụng được tên miền mới
Để cấu hình tên miền mới trỏ vào localhost, bạn có thể chỉnh sửa hosts file tại C:\Windows\System32\drivers\etc\hosts. Tuy nhiên cú pháp của hosts file mặc định lại không hỗ trợ Wildcard Domain mà bạn sẽ phải thêm từng tên miền phụ vào đây.
Một cách khác là bạn hãy sử dụng phần mềm Acrylic DNS Proxy cho Windows. Phần mềm giúp cấu hình local DNS rất tiện lợi và mạnh mẽ, đặc biệt là có hỗ trợ Wildcard Domain.
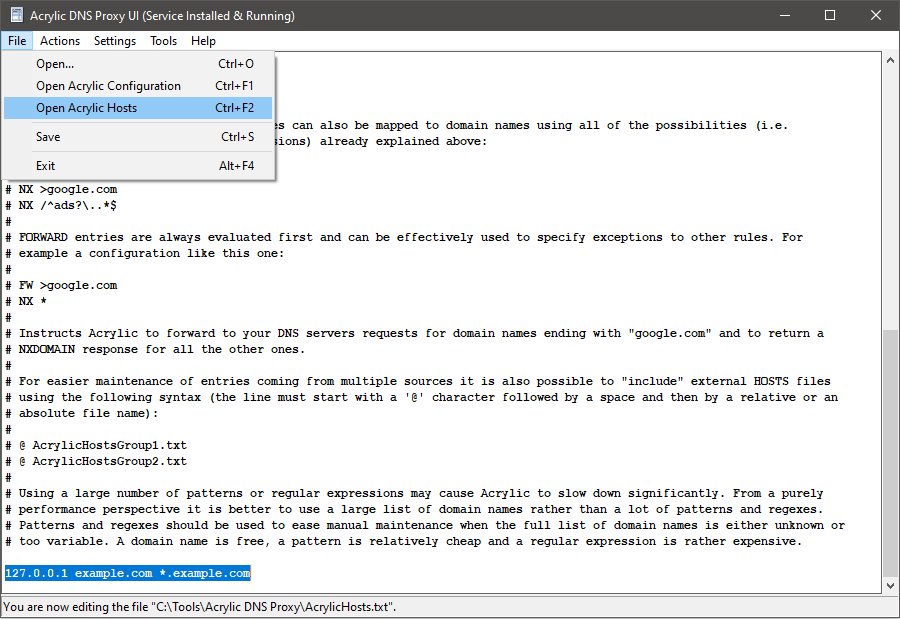
Sử dụng Acrylic DNS Proxy rất đơn giản, bạn mở phần mềm, truy cập menu File > Open Acrylic Hosts, rồi thêm địa chỉ IP và tên miền giống như cú pháp của hosts file như sau:
127.0.0.1 example.com *.example.com
Sau đó vào menu Actions > Install Acrylic Service để đăng ký chương trình chạy dưới dạng Service, việc này chỉ cần làm một lần. Về sau khi chỉnh sửa file hosts thì service cũng sẽ khởi động lại.
Để sử dụng được hãy cấu hình DNS Server của hệ thống hoặc trình duyệt trỏ vào địa chỉ IP của localhost:
- IPv4 127.0.0.1
- IPv6 ::1
Cuối cùng hãy đóng tất cả các trình duyệt đang mở, rồi mở lại chúng.
Xong, hãy truy cập thử test.example.com trên trình duyệt xem nào!